Configuring your server to provide HTTPS using Let's Encrypt certificates is free and easy. All it takes is to...
It’s well known that SSL/TLS encryption of your website leads to higher search rankings and better security for your users. For the last couple of months Chrome browser displays a broken lock near URL address bar on sites where user submits data without SSL.
For the time there was two big barriers for implementing SSL Certificates - Manually getting a certificate and of course price.
Let's Encrypt chaged that forever, they offer a free SSL Certificate. Certificates issued by Let’s Encrypt are trusted by most browsers today, including older browsers such as Internet Explorer on Windows XP SP3. In addition, Let’s Encrypt fully automates both issuing and renewing of certificates by providing a great tool, called Certbot, that can parse webservers configuration files (e.g. nginx, IIS, apache) and set them up automatically. It can event setup a HTTP->HTTPS redirect for your webiste!
There are number of ways to obtain a Let's Encrypt certificate. First of all Let's Encrypt must vaildate the ownership of a domain. Certbot takes care of that automatically, you can set up a DNS records for that but it's long and cumbersome way. Certbot can use existing webserver to expose a unique token that identifies your domain during a certificate generation.
Enough said, let's get down to the bussiness. Below are 6 easy steps that will ensure getting, installing and validating a SSL certificate. For the sake of simplicity we will use an Ubuntu 18.04 installation.
1. Install Certbot
2. Install Nginx (optional)
3. Setup a virtual host or reverse proxy in Nginx (optional)
4. Request Let's Encrypt SSL certificate with Certbot using CLI
5. Verify SSL with SSLLabs
6. Setup Cron job for renewing your certificate
1. Install Certbot
It is possible that the Certbot package is missing from package list, you can simple add Certbot repository to apt to download latest release:
add-apt-repository ppa:certbot/certbot
apt-get update
apt-get install python-certbot-nginx
2. Install Nginx
If Nginx is not installed on your host, you can do it with single command:
apt-get install nginx3. Setup a virtual host or reverse proxy in Nginx
If you already have virutal hosts set up, you can skip this step. However, remember to make a backup of the file, because Certbot will certainly edit them. If not, follow these stepse.
We will create a simple host that will point to static HTML file, but you can combine SSL certificate with proxy. This is our recipe for Node.js apps. In Code Fibers we always start multiple Node.js processes on a single host and serve them via single Nginx proxy on port 443. Check out the samples below:
Serving static files:
server {
        listen 80;
        listen [::]:80;
        root /var/www/html;
        server_name my-domain.com;
}
Nginx as a reverse proxy:
upstream app {
    zone app 64k;
    server 0.0.0.0:8001 max_fails=0 fail_timeout=10s weight=1;
    server 0.0.0.0:8002 max_fails=0 fail_timeout=10s weight=1;
}

server {
    listen 80;
    listen [::]:80;
    server_name my-reverse-proxy-domain.com;
    location / {
        proxy_pass http://app;
    }
}
4. Request Let's Encrypt SSL certificate with Certbot using CLI
Now the easy part, obtaining a certificate using Certbot. Note that you can request certificates for multiple domains in one command. The parameter -d specifies the domains for which you want to request a certificate. Make sure to replace it with your own domain name.
certbot --nginx -d my-domain.com -d my-reverse-proxy-domain.comWhen running Certbot for the first time, you will be asked to enter your email address. Confirm it by pressing Enter on your keyboard.
Once confirmed Certbot will run a challenge and request the certificate. When asked to redirect all traffic to HTTPS, press 2, then Enter on your keyboard.
5. Verify SSL with SSLLabs
After all steps has been completed, you can validate certificates using SSLabs test. Just type in your domain name and wait for the results.
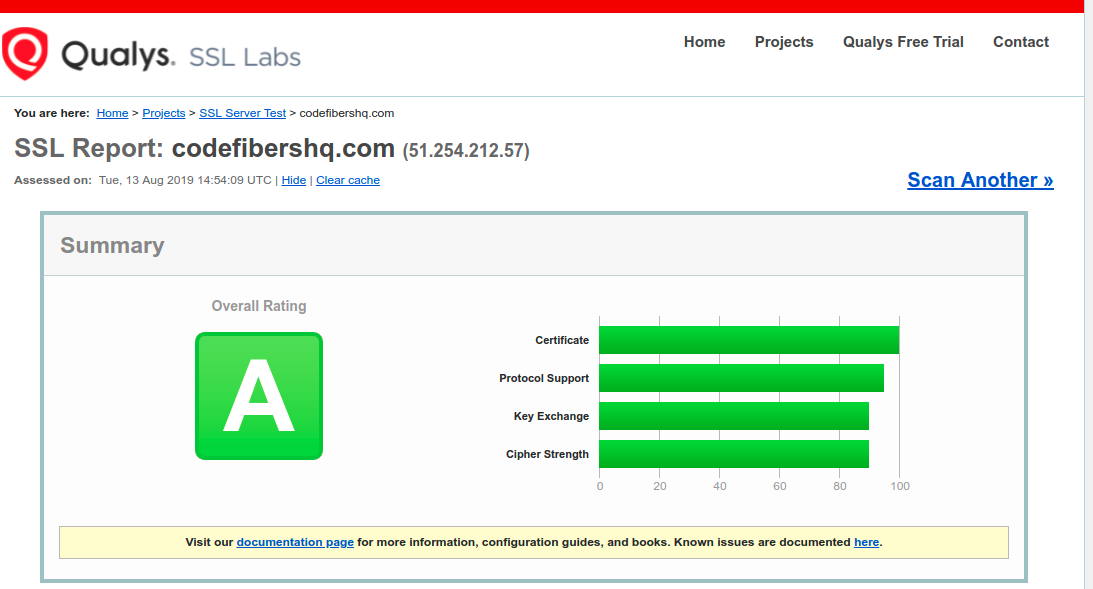 Example for codefibershq.com
6. Setup Cron job for renewing your certificate
Obtained certificates need to be renewed every two months or so, Let'S Encrypt is strict about it. You need to ensure to run certbot renew on your host at least every couple of weekd. Open crontab in edit mode
crontab -eAnd add a line below:
0 5 */20 * * certbot renewThis will run command certbot renew every 20th day of a month at 5 am.
That's it, I'm glad that you made it here, setting an SSL Certificate with Let's Encrypt and Certbot is realy simple, you shouldn't have any problems for setting a cert on other platforms and with different webservers.
Similar searches: lets encrypt nginx / free ssl certificate / ssl nginx / A+ ssllabs test / reverse proxy with nginx / secure nginx lets encrypt / nginx https / free nginx https / ubuntu nginx ssl / free ssl for seo