RabbitMQ is an excellent open-source project that allows you to deliver hundreds of thousands of messages per second to your application quickly and efficiently. The following entry presents the way in which you can place a RabbitMQ cluster of three separate hosts. For this purpose, we will use Docker, and connect to the ready cluster using Node.js.
About RabbitMQ
RabbitMQ is a queuing system based on the AMQP protocol, the system itself was written in Erlang. Thanks to the use of this language, RabbitMQ is ideally suited for use as a central data bus in the microservice architecture. Such a rail provides a great substrate for applications allowing a large dynamic range of development in the DDD and CQRS paradigm. Since the data bus (queue of messages) is the backbone of architecture, it is important that it is always available and resistant to failures. Redundant architecture becomes the natural choice, ie replication of data into separate executive nodes.
Replication in RabbitMQ is supported natively in master-slave mode. This means that RabbitMQ will always select one node for each created queue and it will redirect all messages to it for saving, as well as retrieve messages from it for reading from the queue, the other nodes (slaves) act as a data replicator ready in take over the role of the master node at all times. Although the greatest sense is replication when nodes are scattered on different physical machines, in this case I will use an example of replication within the same machine. RabbitMQ due to its purpose - that is, hundreds of thousands of supported messages per second, is not preferred in replication mode on machines that are not in the same server rack. This is due to the fact that messages stay in the queue very short and the assumptions should not go beyond RAM, replicate them based on a network connection in a different part of the data center or to a completely different data center would mean drastic decreases in performance, and in this system class can not be afforded. In addition, by placing RabbitMQ nodes close to each other, we minimize the risk of so-called network partition (which is very unlikely in the case of one roulette), i.e. the phenomenon of interrupting communication between nodes in such a way that at least 2 nodes from the entire cluster consider themselves as master. More about the network partition in the context of RabbitMQ can be read here.
Therefore, the practice-based rule is putting RabbitMQ in replication mode only in the same data center.
Downloading Docker images
I assume that you know what is Docker and how to use it, because in the next part of the entry we will use it widely
To start with, start by downloading the appropriate RabbitMQ images (along with the admin panel plugin) and Node.js, for this purpose we use the following commands:
docker pull 3.6.6-management
docker pull node:11.10.1
Setup RabbitMQ hosts
For the purposes of the presentation, we will launch one RabbitMQ image to which we will connect with the docker exec command and invoke the bash shell to be able to run the configuration in our way. Let's use the command:
docker run --hostname rabbit --name rabbit --rm -ti --net="host" rabbitmq:3.6.6-management /bin/bashThe above command will run the image from RabbitMQ which will be deleted after leaving the shell. The instance will be connected to our network interface so we do not have to worry about port forwarding. If the shell root@rabbit:/# appeared to our eyes, it means everything went well.
The next step is to run three RabbitMQ processes on separate ports, each process will receive a unique name.
RABBITMQ_NODE_PORT=5672 RABBITMQ_SERVER_START_ARGS="-rabbitmq_management listener [{port,15672}]" RABBITMQ_NODENAME=rabbit rabbitmq-server -detached
RABBITMQ_NODE_PORT=5673 RABBITMQ_SERVER_START_ARGS="-rabbitmq_management listener [{port,15673}]" RABBITMQ_NODENAME=hare rabbitmq-server -detached
RABBITMQ_NODE_PORT=5674 RABBITMQ_SERVER_START_ARGS="-rabbitmq_management listener [{port,15674}]" RABBITMQ_NODENAME=john rabbitmq-server -detached
Next, with the help of the rabbitmqctl, we attach both nodes to the root with the name rabbit:
rabbitmqctl -n hare stop_app
rabbitmqctl -n hare join_cluster rabbit@`hostname -s`
rabbitmqctl -n hare start_app
rabbitmqctl -n john stop_app
rabbitmqctl -n john join_cluster rabbit@`hostname -s`
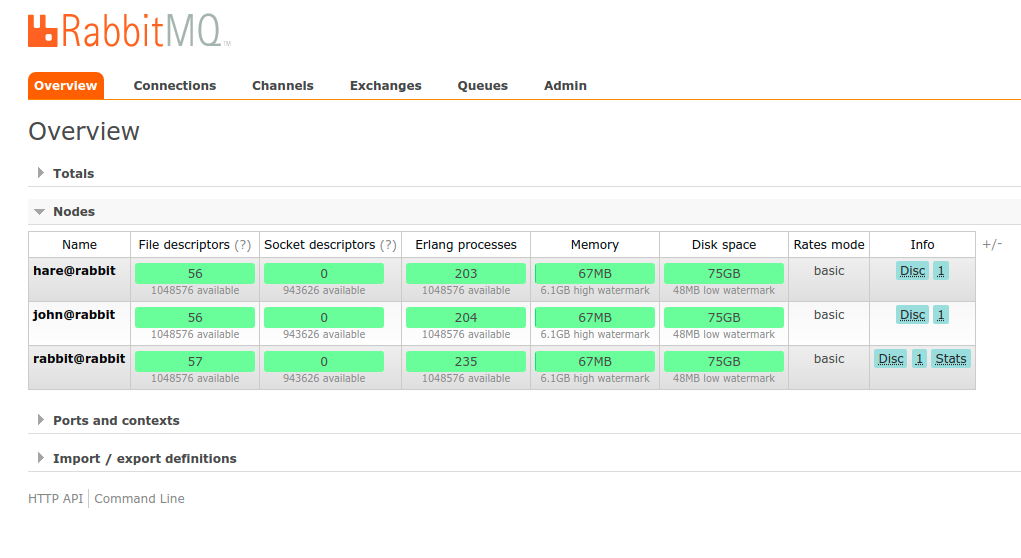
rabbitmqctl -n john start_appAfter all, we can open the browser and enter the address http://localhost:15672 to verify that everything went well, the cluster management console should point to all nodes as on the screen below.
Important. Do not disable the container shell from RabbitMQ as this will remove it (the --rm option on the Docker startup command)
We have the last thing to do, although the RabbitMQ cluster is ready, we need to configure the appropriate policies. This function is implemented using the administration panel, more information about high availability (HA) in RabbitMQ can be read in the documentation.
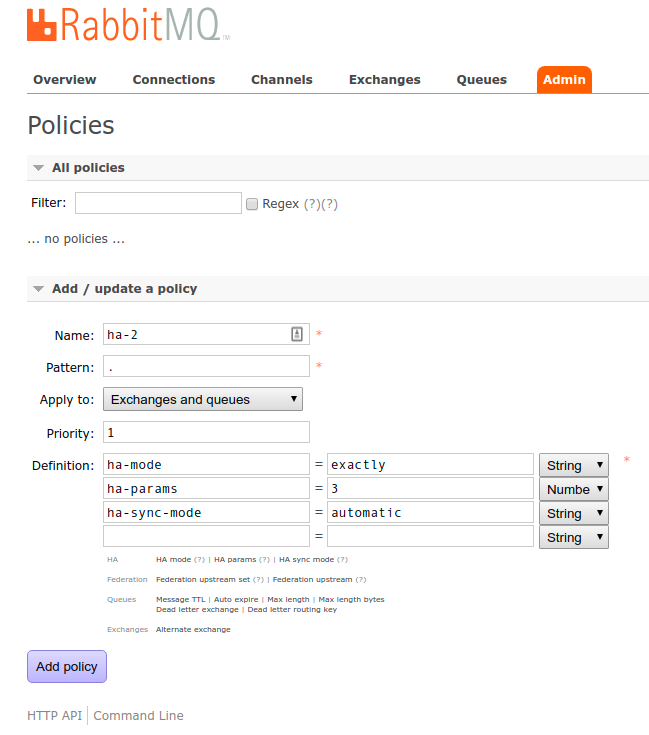
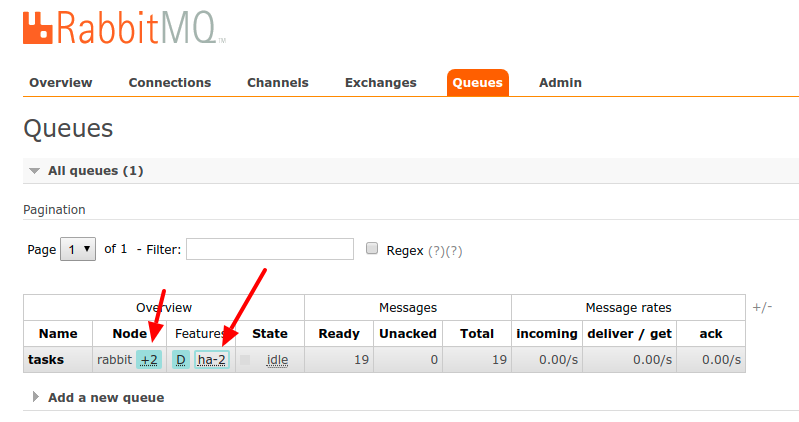
Above is an example of HA policy configuration. And below is the verification method. The number +2 at the node name means the number of separate hosts to which the queue is replicated.
Installation and download of the amqp library at Node.js
The next step is to start the Docker container instance with the Node.js image, for this purpose, run the following command which also shares the network interface.
docker run -ti --rm --net="host" node:11.10.1 /bin/bashThen in the place chosen by our site (eg /home) we create a directory in which we put the necessary scripts and install the amqp-connection-manager library that allows connection to RabbitMQ (or other system implementing the AMQP protocol) from the level of Node.js.
npm install --save amqp-connection-managerIn addition, the library allows the addition of several RabbitMQ host addresses providing a mechanism to reconnect in the event of failure of any host. This is a very useful functionality, because it cares for a proper connection with RabbitMQ and in the event of a failure it can detect messages in memory until the connection appears back.
Sample producer-consumer code
Now that we have all the components prepared, we can start to create a simple code responsible for creating and receiving messages. For this purpose, we will create two files and fill them with a code.
producer.js - the script connects to the RabbitMQ instance and starts sending 10 messages per second.
let q = 'tasks';
let amqp = require('amqp-connection-manager');

function sleep(ms) {
  if(ms <= 0){
    return
  }
    return new Promise(resolve => setTimeout(resolve, ms));
}

let main = async () => {

    var connection = amqp.connect([
        'amqp://localhost:5672',
        'amqp://localhost:5673',
        'amqp://localhost:5674',
    ]);

    var channelWrapper = connection.createChannel({
        json: true,
        setup: function(channel) {
            return channel.assertQueue(q, { durable: true });
        }
    });

    console.log('Starting message stream')
    while (true) {
        await channelWrapper.sendToQueue(q, { value: Math.random() })
        await sleep(100)
    }
}

main()
consumer.js - the script connects to the RabbitMQ instance and starts reading messages from the queue.
let q = 'tasks';
let amqp = require('amqp-connection-manager');

let main = async () => {

    var connection = amqp.connect([
        'amqp://localhost:5672',
        'amqp://localhost:5673',
        'amqp://localhost:5674',
    ]);

    var channelWrapper = connection.createChannel({
        json: true,
        setup: function(channel) {
            return channel.assertQueue(q, { durable: true });
        }
    });

    channelWrapper.addSetup(function(channel) {
        return Promise.all([
            channel.consume(q, (msg) => {
                console.log(msg.content.toString())
            }, {noAck: true , exclusive: false })
        ])
    });
}

main()
Files created this way can be run separately using Node.js and watch as consumer.js receives data produced by producer.js. In order to verify the replication operation in the RabbitMQ cluster, I encourage you to disable during the exchange of data by scripts one of the RabbitMQ processes to see how the failure will be handled and how RabbitMQ will select the new master and redirect the messages accordingly.
rabbitmqctl -n john stop_appDisabling one of the RabbitMQ instances does not affect the production or downloading of messages. Queues are automatically replicated and the connection recovered without the need to implement its own mechanisms.
In summary, RabbitMQ is a great queuing system that ensures high availability after a proper configuration that does not cause many problems. A large number of libraries in many languages, eg Node.js, PHP, Java, Python, Golang, C / C ++, allows easy implementation of the system in the project. I recommend everyone to read the documentation which explains very clearly the issues related to the operation of the system and its correct configuration, which is really extensive.
All code is kept in repository on GithubSimilar searches: nodejs rabbitmq / nodejs queue / rabbitmq queue nodejs