Cloud Run is a new managed service on Google Cloud Platform that lets you run your containerized applications right from Docker image. The huge advantage of this service is that it charges you only when your app is actually used!
With the advent of cloud solutions, hosting web applications has become even easier and more accessible. This does not mean that it has become cheaper. Looking at the prices of VPS instances in the cloud and those from providers such as OVH, it is not difficult to add that the difference in the costs of maintaining even the smallest virtual servers is significant. As the size of the instances increases, the price difference also increases.
It should be remembered that what the cloud promises us is primarily flexibility and it works best in this. In this post, I would like to introduce to you how we can use the new Google cloud service, named Cloud Run.
What is Cloud Run?
Cloud Run is nothing more than a runtime environment operating containerized applications. Google wants to simplify the application model as much as possible and hide the hardware layer under the abstraction. In Cloud Run, we manage containers that during creation, can only have the RAM memory assigned. The Cloud Run itself ensures that the application has enough computing power to meet the load. Google also automatically controls the scaling of containers, ensuring that regardless of the current demand, work is not interrupted and starts more containers if the load increases.
There are two ways to trigger work in a container. Anyway, Cloud Run requires us to put the webserver process on port 8080 (or other defined) that will handle incoming requests. They can appear in a traditional way, sending a request to the HTTP endpoint generated by Google (Google will take care of the load balancing between container instances, only one working container is visible to us) or by sending a message to a topic in PubSub, Cloud Run has integration with PubSub which can be set so that messages from the topic are automatically directed to the container and consumed by it.
The pricing of the Cloud Run service is similar to Cloud Functions. We pay only for the actual running time of the application rounded to the second, and we pay only for the total container working time, what distinguishes Cloud Run from Cloud Functions (apart from operating based on the Docker images) is that the container in Cloud Run can handle many requests simultaneously. In this case, we will be charged for the time from the start of the first to the end of the last request. This is a different model as in the case of Cloud Functions where we are charged for the duration but also the number of invocations of a given function.
Moving on to the specifics and topic of this post. Cloud Run, offers to launch any container, it really opens the door for us to launch any application in the on-demand price list model. Below I will show how we can run a sample container deployment containing the Chrome Headless browser that will be in readiness and waiting for our requests 24/7 but without charging us for the standby time. To give this post more context, let's imagine the project.
Sample implementation of Cloud Run with Chrome Headless
The client comes to us with a specific request: "I have an XYZ.com website and I would like to download data on demand from it using a scraper, the problem is that the website is a SPA (single page app) and traditional scraping does not work. I would like a solution that will enable Chrome Headless on demand (probably several times a day), but also that it is not too expensive to maintain, since I will not be using it too much."
Cloud Run comes in handy, the project structure looks like this:
- 1. Creating a Docker image containing installed Chrome Headless along with a simple application in Node.js which is using the Puppeteer library that connects to a local browser and using the CDP (Chrome DevTools Protocol) protocol will perform the appropriate set of actions through the browser.
- 2. Build and send image to Google Container Registry.
- 3. Launching the Cloud Run service with our previously created container.
- 4. The application is ready and we can start using it. The bill remains low despite the fully operational Chrome Headless deployment.
Deployment of a Docker image with Chrome installed for Cloud Run
The first thing we need to do is to create our application based on a Docker image containing installed Chrome. In this example, we will be based on an application written in Node.js
FROM node:10-slim

# Create and change to the app directory.
WORKDIR /usr/src/app

# Copy application dependency manifests to the container image.
# A wildcard is used to ensure both package.json AND package-lock.json are copied.
# Copying this separately prevents re-running npm install on every code change.
COPY package*.json ./

RUN apt-get update
RUN apt-get install -y gconf-service libasound2 libatk1.0-0 libcairo2 libcups2 libfontconfig1 libgdk-pixbuf2.0-0 libgtk-3-0 libnspr4 libpango-1.0-0 libxss1 fonts-liberation libappindicator1 libnss3 lsb-release xdg-utils
RUN wget https://dl.google.com/linux/direct/google-chrome-stable_current_amd64.deb
RUN dpkg -i google-chrome-stable_current_amd64.deb; apt-get -fy install

# Install dependencies.
RUN npm install --production

# Copy local code to the container image.
COPY . .

# Run the web service on container startup.
CMD [ "node", "app.js" ]
Using such base in the Dockerfile file, we can be sure that the built image will always contain the installed Chrome browser.
The next step will be to build the image and send it to the Container Registry in GCP. To do this, the easiest way is to use the CLI tool, let me refer you to instructions , remember that the image build operation we will perform for a specific project, so you must first authenticate in the tool.
The command itself is not complicated and we execute it in the application directory, where the Dockerfile file is also located.
# {PROJECT-ID} - project ID we can find in Google Cloud Console
# {IMAGE-NAME} - the name of the image that will identify our container
gcloud builds submit --tag gcr.io/{PROJECT-ID}/{IMAGE-NAME}
Below I also paste the sample application code in Node.js which we can embed in the image in app.js file.
#app.js
const express = require('express');
const puppeteer = require('puppeteer');
const bodyParser = require('body-parser');
const app = express();
app.use(bodyParser.json());

app.post('/', async (req, res) => {

    // puppeteer action code here...

})

let browser

let main = async () => {
    browser = await puppeteer.launch({
        headless: true,
        args: [
            '--disable-gpu',
            '--no-sandbox',
        ],
        executablePath: 'google-chrome'
    });

    app.listen(8080, () =>
        logger.log(`listening on port ${PORT}`)
    );

}

main()
Running the image from Container Registry as a Cloud Run service
As I mentioned earlier, we can launch the Cloud Run container in two modes - private and public. Private mode is characterized by the fact that access to the container or rather the server process on port 8080 is protected and available only by configuring the PubSub queue. The second mode, i.e. public, assigns our container a unique address in the run.app domain that allows you to send HTTP requests to the server on port 8080 directly. In this post we will focus on the second configuration due to the simple configuration.
To launch the Cloud Run container service, we enter the Cloud Run service in our project and proceed to launch the service. The process itself requires only a handful of configuration.
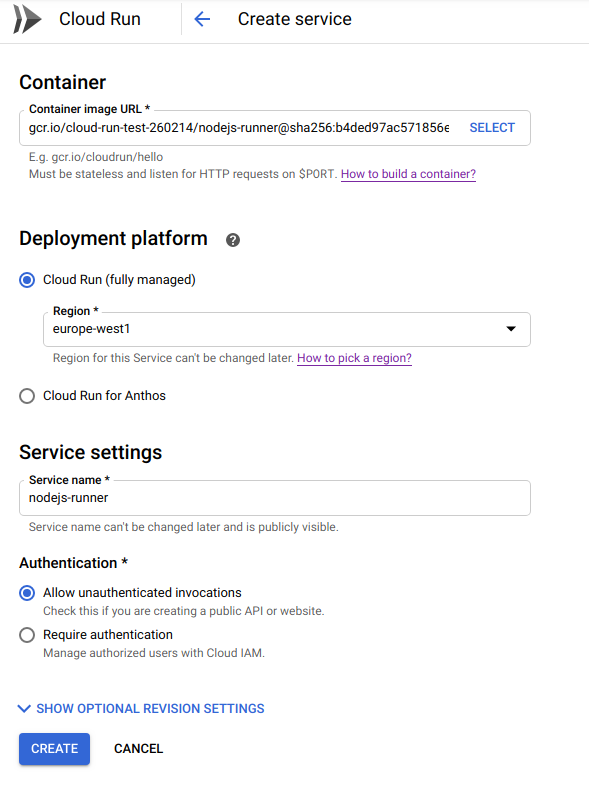
First of all, we need to select the image from the Container Registry, give it a name, select the region and decide on the way to access the service (public or protected). The screenshot above shows the configuration of the sample service with public access.
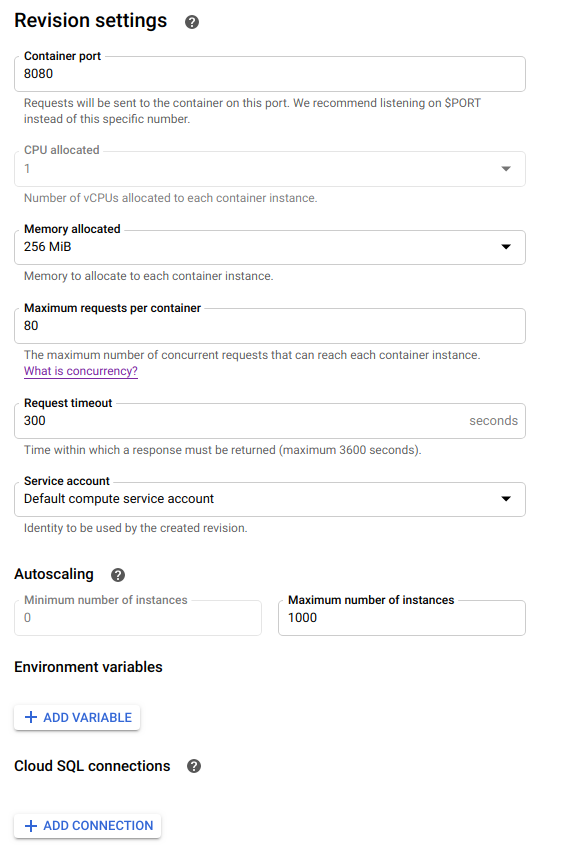
In addition, Cloud Run allows you to configure available RAM, webserver port (if different from standard), as well as the number of queries per container and their timeout. This is important because if the limit is reached, Cloud Run will launch another instance of the container automatically, which will affect the additional multiplier in the service bill.
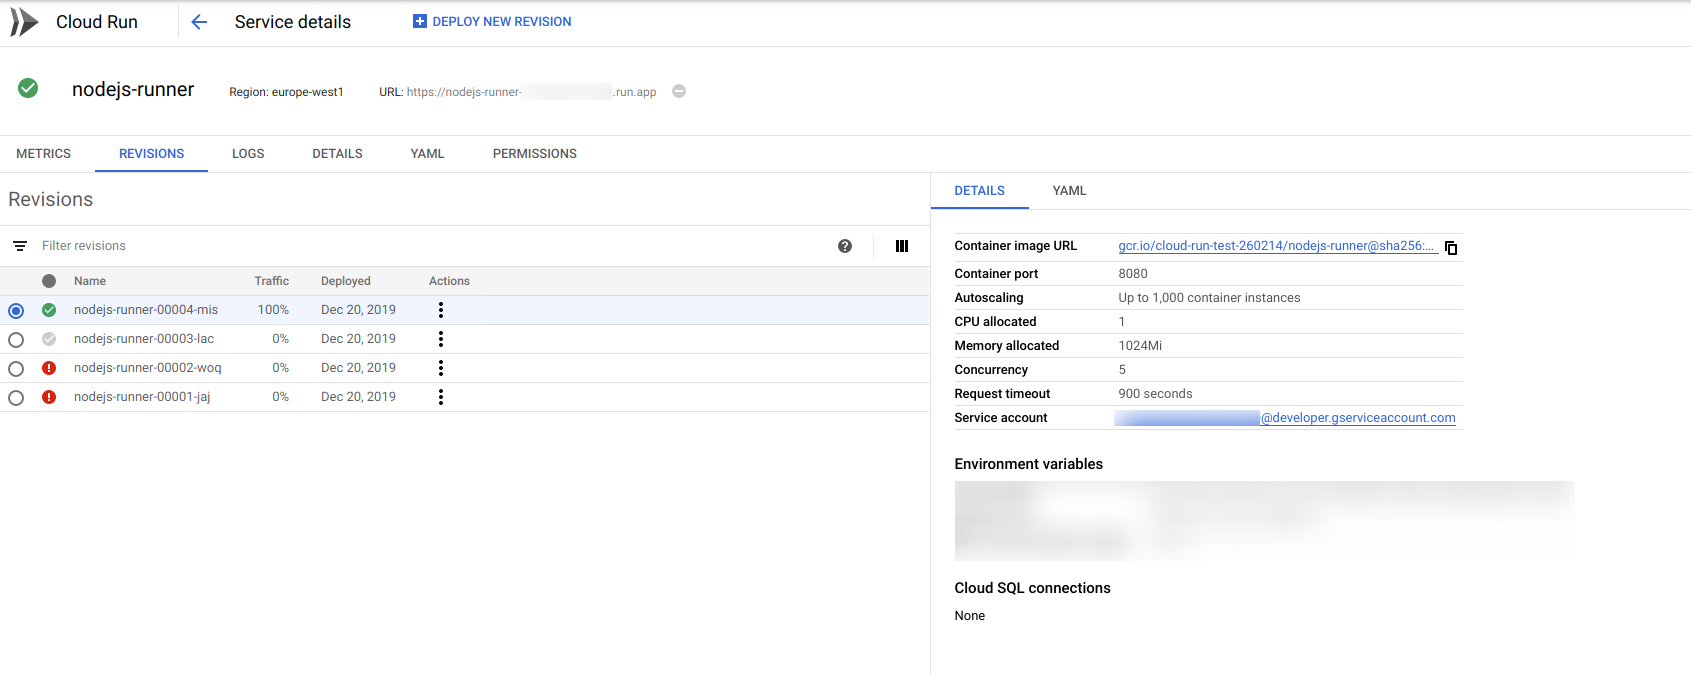
After all, our container will be active and all details can be viewed in the console. We will also find ther the assigned URL, and from there we can implement the new version in case the container image version changes. Thanks to the "Logs" tab, we have a preview of the messages displayed by the application process in "tail" mode.
In summary, Cloud Run is a great service when budget and flexibility are important to us. Thanks to Docker based, Cloud Run allows you to deploy any application with many dependencies and use it only when you really need it. Integration with PubSub is even more conducive to deployments in large architectures. In my opinion, the cloud will be heading in the direction of container launch services without access to hardware, soon, offers for dedicated servers and VPS can sleep lower in the offer of cloud providers and their place will be taken by "Cloud Run"-like services. I encourage you to try to find out how easy it is. At Code Fibers, we are already after the first production deployment for the client, so if you have questions about such implementation, we will gladly answer them!